Basics of InDesign
Set-Up Your Poster
1. Create New > ‘Print’ tab
2. Change Units to ‘Inches’ and set the size: 48” (Width) x 36" (Height)
3. Uncheck ‘Facing Pages’ (For publications to create spreads)
4. Check Preview Option to see everything
5. Set Columns and Gutter if they need it > Set Margins (Recommend 1”)
6. Bleed is used for any graphic elements that may get cut off (If want to use bleed, ⅛” or 0.125”)
Adjusting Margins After Creating Your Document
Be sure to check the “Preview” box, so you can see the adjustments being made.
File > Document Set-Up > Under “Margins”
Adjusting your Workspace
To change the workspace, go to the upper right-hand corner of the window,
go to the dropdown and select “Essentials Classic.”
To view certain panels go to Window and select the panels you will be using most often.
Recommended: Layers, Links, Styles > Paragraph Styles, Object & Layout > Align
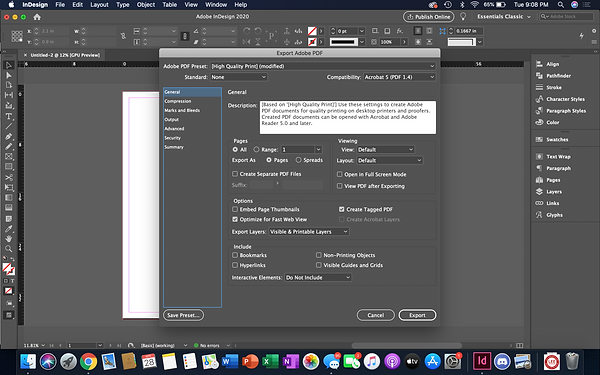
Export as PDF
PDF is typically the file format to use when bringing it to a printer, however you can always double check by talking to the printer and see if they have a preferred Adobe PDF Preset.
File > Export > Format: Adobe PDF (Print) > Adobe PDF Preset: [High Quality Print] or [PDF/X-1a:2001] > Export
Packaging
Packaging is a way to keep all of your “links,” which include your image files, graphs/chart files, text files, and any other placed files in your research poster together in one main folder, also known as the packaged file. It’s important to package your file and to work from that file so that you can keep everything together and you do not have any lost links. For example, if you have a few images on your desktop and one in your downloads folder - packaging will put it all together.
What if I want to work on the packaged file another time on another computer and end up adding and changing a couple of images?
It is best to drag the folder onto the desktop and work from there. If you work on the file on your USB or hard drive, this can potentially corrupt the file/hard drive and it may be slower. With images, you can always save your new images in the links folder, so you will not have to repackage the whole file. However, another option is to repackage the file as well.
To Package a File
File > Package > Package
Note: You may see a caution symbol because of the color space some of your images may be in. If you are interested in learning more about that, you can contact me and I can further explain how that works. This has to do with RGB and CMYK, so it may or may not affect your colors on your poster. Colors will be in RGB if it’s an image downloaded from the internet, however if you want to change them in CMYK you can in photoshop and change the colors there.
Back-Up Your Work!
Back-up your work in 2 - 3 locations, such as Google Drive, USB drive, external hard drive, and/or email are a few options!


